Using Spring Cloud AWS in Lambda functions to automate SDK client configurations.
Introduction.
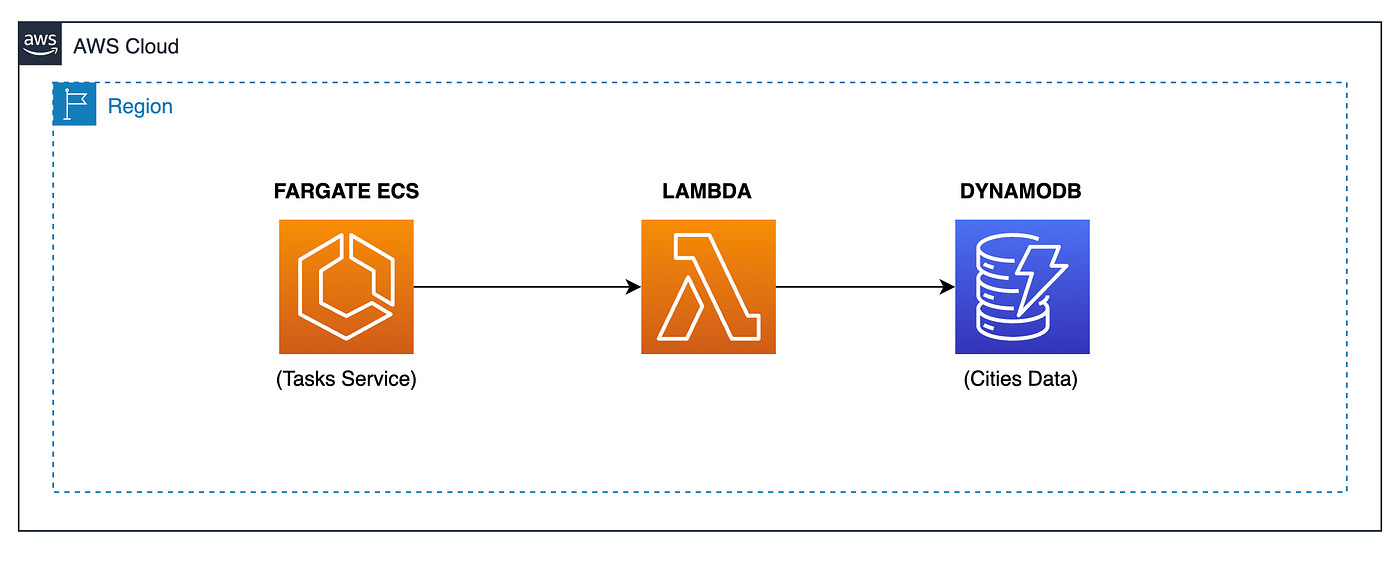
In our previous tutorial, I used a fullstack project to talk about the configuration of a Monorepo to store a Spring Boot project for the backend and Angular for the front-end. In the case of the backend, I also used a Lambda function to store the event’s data from an ECS service in a DynamoDB table. I used Spring Cloud Function to configure and deploy the function artifact into AWS Lambda for this case. We did this using a Native Linux Executable built using Spring Native with GraalVM and Java 17.
So, let’s create a new Lambda function using the same technologies, upgrading the Java version to 21 and using a new dependency called Spring Cloud AWS, which helps us automate the creation of AWS SDK clients, like the DynamoDB client.
Tooling.
To complete this guide, you’ll need the following tools:
- Git.
- AWS CLI (version 2.11.+)
- AWS SAM CLI (version 1.97.+)
- OpenJDK (version 21.+). You can use SDKMAN to install it.
- Apache Maven (version 3.9.+). You can use SDKMAN to install it.
- Docker engine. You can use Docker Desktop or Colima.
- Java IDE. You can use IntelliJ.
Note 1: You can download the project’s source code from my GitHub repository, which contains all the configurations made in this tutorial.
Note 2: This is an initial project configuration. The structure of this project may be unfamiliar to you because it is intended to belong to a Monorepo. I’ll be adding more building blocks in the future, such as an Angular project or another Lambda function. In this case, the Monorepo will make more sense to you.
Dependencies.
As I said before, I’ll use the Lambda function created in my previous tutorial as a baseline for the project structure for this tutorial. I’ll remove the <software.amazon.awssdk> dependency in favor of the <spring-cloud-aws-dependencies> dependency in the parent POM file:
<dependencyManagement>
    <dependencies>
        ...
        <dependency>
            <groupId>io.awspring.cloud</groupId>
            <artifactId>spring-cloud-aws-dependencies</artifactId>
            <version>3.0.0</version>
            <type>pom</type>
            <scope>import</scope>
        </dependency>
    </dependencies>
</dependencyManagement>
Then, add the following dependencies to configure the DynamoDB client in our project automatically:
<dependency>
    <groupId>io.awspring.cloud</groupId>
    <artifactId>spring-cloud-aws-starter</artifactId>
</dependency>
<dependency>
    <groupId>io.awspring.cloud</groupId>
    <artifactId>spring-cloud-aws-starter-dynamodb</artifactId>
</dependency>
In the case of Testcontainers, I removed the <testcontainers-bom> dependency in favor of the <spring-boot-testcontainers> dependency:
<dependency>
    <groupId>org.springframework.boot</groupId>
    <artifactId>spring-boot-testcontainers</artifactId>
    <scope>test</scope>
</dependency>
A new feature in Spring Boot 3.2 was the Docker Compose support. This feature will be helpful for testing as we will execute integration tests with Testcontainers:
<dependency>
    <groupId>org.springframework.boot</groupId>
    <artifactId>spring-boot-docker-compose</artifactId>
    <scope>runtime</scope>
    <optional>true</optional>
</dependency>
I’ll discuss the configuration and use of this dependency later in the tutorial.
Finally, I removed the use of Lombok from our project. I’m using Spring Native with GraalVM, and this library frequently uses reflection. So, I don’t want to depend much on this kind of library because of the risk of errors in generating the native Linux executable in the future. Furthermore, let’s use Java records instead ;)
Testcontainers with LocalStack.
As usual, I’ll use Testcontainers to validate the integration between the Lambda function code and DynamoDB. So, I’ll preserve the same strategy as in our previous tutorial, using a parent class to configure the LocalStack service with DynamoDB for integration tests:
LOCALSTACK_CONTAINER = new LocalStackContainer(DockerImageName.parse("localstack/localstack:3.5"))
    .withServices(LocalStackContainer.Service.DYNAMODB)
    .withCopyToContainer(MountableFile.forClasspathResource("localstack/table-setup.sh"),
        "/etc/localstack/init/ready.d/table-setup.sh")
    .withCopyToContainer(MountableFile.forClasspathResource("localstack/table-data.json"),
        "/var/lib/localstack/table-data.json");

LOCALSTACK_CONTAINER.start();
As you see, I’m only using the DynamoDB service for the integration tests. Likewise, I’m mounting 2 files. The first one is to create the DynamoDB table when the LocalStack container is starting:
#!/bin/bash

echo ""
echo "CREATING DYNAMODB TABLE..."
awslocal dynamodb create-table                \
  --table-name 'Cities'                       \
  --attribute-definitions                     \
    AttributeName=id,AttributeType=S          \
  --key-schema                                \
    AttributeName=id,KeyType=HASH             \
  --provisioned-throughput ReadCapacityUnits=5,WriteCapacityUnits=5

echo ""
echo "WRITING ITEMS INTO DYNAMODB..."
awslocal dynamodb batch-write-item  \
  --request-items file:///var/lib/localstack/table-data.json
Notice that I’m loading some testing data into the “Cities” table at the end of the bash file. That’s the objective of the second file I’m loading into the LocalStack container:
{
  "Cities": [
    {
      "PutRequest": {
        "Item": {
          "id": {
            "S": "a0ecb466-7ef5-47bf-a1ca-12f9f9328528"
          },
          "name": {
            "S": "Hiperium City"
          },
          "status": {
            "S": "ACT"
          },
          ...
        }
      }
    }
  ]
}
Then, we must specify the same parent class, the AWS properties to be used by the DynamoDB client to interact with the LocalStack container:
@DynamicPropertySource
public static void dynamicPropertySource(DynamicPropertyRegistry registry) {
    registry.add("aws.region", LOCALSTACK_CONTAINER::getRegion);
    registry.add("aws.accessKeyId", LOCALSTACK_CONTAINER::getAccessKey);
    registry.add("aws.secretAccessKey", LOCALSTACK_CONTAINER::getSecretKey);
    registry.add("spring.cloud.aws.endpoint", () -> LOCALSTACK_CONTAINER.getEndpoint().toString());
}
I’m using the LOCALSTACK_CONTAINER static variable to obtain the running container information, such as the region, credentials, and, more importantly, the AWS endpoint with which to interact.
The test classes must extend our parent class, which initializes the LocalStack container before executing the test methods:
@ActiveProfiles("test")
@FunctionalSpringBootTest(classes = FunctionalApplication.class)
class FunctionalApplicationTest extends TestContainersBase {

    // The rest of the test class.
}
Recall I’m using the same project structure as in our previous tutorials, so the content of the test methods has the same goal: find the function bean and invoke it. You can also execute the entire test class directly in the IDE if you’re using IntelliJ:

In this case, I’m only validating the happy and unhappy paths for test cases. If you prefer, you can add more test cases.
Configuring DynamoDB Client.
From now on, we don’t have to create a configuration class for AWS SDK clients as we did in our previous tutorials with the following class:
@Configuration
public class DynamoDBClientConfig {

    private final Environment environment;

    public DynamoDBClientConfig(Environment environment) {
        this.environment = environment;
    }

    @Bean
    public DynamoDbClient dynamoDbClient() {
        var builder = DynamoDbClient.builder()
                .region(DefaultAwsRegionProviderChain.builder().build().getRegion())
                .credentialsProvider(DefaultCredentialsProvider.builder().build());
        String endpointOverrideURL = this.environment.getProperty(PropertiesUtil.AWS_ENDPOINT_OVERRIDE_PROPERTY);
        if (Objects.nonNull(endpointOverrideURL) && !endpointOverrideURL.isBlank()) {
            builder.endpointOverride(URI.create(endpointOverrideURL));
        }
        return builder.build();
    }
}
The Spring Cloud AWS libraries now automate this configuration for us. So we have one less thing to think about.
If you’re testing the application directly from the IDE, you must specify the following system properties in your configuration file for your default Spring profile:
spring.cloud.aws.region.static=us-west-2
spring.cloud.aws.credentials.accessKey=test
spring.cloud.aws.credentials.secretKey=test
spring.cloud.aws.endpoint=http://localhost:4566
If you plan to deploy the application inside a Docker container or a cluster using Docker Compose, you can use the standard AWS environment variables instead. The following section will discuss this further.
So now, without any configuration class to create the DynamoDB client, we use it in any Spring Bean as usual:
@Configuration(proxyBeanMethods=false)
public class FunctionsConfig {

    private final DynamoDbClient dynamoDbClient;

    public FunctionsConfig(DynamoDbClient dynamoDbClient) {
        this.dynamoDbClient = dynamoDbClient;
    }

    ...
}
After that, we can invoke any CRUD operation using the DynamoDB client. In our case, we only used it to retrieve information about a City:
@Override
public CityResponse apply(Message<CityIdRequest> cityIdRequestMessage) {
    ...
    try {
        Map<String, AttributeValue> returnedItem = this.dynamoDbClient.getItem(request).item();
        if (Objects.nonNull(returnedItem) && !returnedItem.isEmpty()) {
            return this.cityMapper.toCityResponse(returnedItem);
        }
    } catch (DynamoDbException e) {
    }
}
Notice I’m using Mapstruct to transform the returned data from DynamoDB into a Java object.
Problems with DynamoDB Enhanced Client.
If you plan to build a native Linux executable like me, don’t use the enhanced client because this dependency constantly uses Java reflection, and this feature is not GraalVM friendly. You can review about this topic in a previous tutorial I wrote, reading section 8:
However, this is not always true because I haven’t had problems with Lombok, but it is evident that there is a limitation in the case of the DynamoDB Enhanced Client.
Docker Compose support for Spring Boot.
Using Spring Boot 3.2 or later, the framework added support for Docker Compose natively. So, if you’re using IntelliJ, you can start the application from the main class:

This applies to regular Spring Boot web application projects and Lambda functions, as in our case.
You need to add the following properties to your default Spring profile as follows:
spring.docker.compose.enabled=true
spring.docker.compose.lifecycle-management=start_and_stop
spring.docker.compose.file=functions/city-data-function/tools/docker/compose.yaml
Notice that you must specify the path of your Docker Compose file inside the project directory. This is a regular compose file that configures LocalStack with the DynamoDB service to test the integration:
services:
  localstack:
    image: "localstack/localstack:3.5"
    ports:
      - "4566:4566"
    env_file:
      - local.env
    volumes:
      - /var/run/docker.sock:/var/run/docker.sock
      - ../../src/test/resources/localstack/table-data.json:/var/lib/localstack/table-data.json
      - ../../src/test/resources/localstack/table-setup.sh:/etc/localstack/init/ready.d/table-setup.sh
I’m importing the last 2 files to the LocalStack container, just as we did when running the integration tests using Testcontainers. So, we’re applying the same procedure for local testing with Docker Compose.
So, Spring Boot will use the previous Docker Compose file to start the docker cluster with the specified image configurations. But we must add another configuration because we’re not deploying our Lambda function as a web application. We must allow our function to be called as it was a web application:
spring.main.web-application-type=reactive
spring.cloud.function.web.export.enabled=true
It’s important to note that this configuration must be applied only for local testing. Setting this property when you deploy the function to production environments is not a good idea.
After these settings are applied, you can use the cURL command to call the Lambda function, as it has a REST endpoint:
curl -H "Content-Type: application/json" "http://localhost:8080/findById" \
     -d @functions/city-data-function/src/test/resources/requests/lambda-valid-id-request.json
After executing this command in your terminal, you must get a response like this:

Note the JSON response in the IntelliJ terminal window. This indicates that the function is interacting with the deployed LocalStack service to retrieve data from DynamoDB:
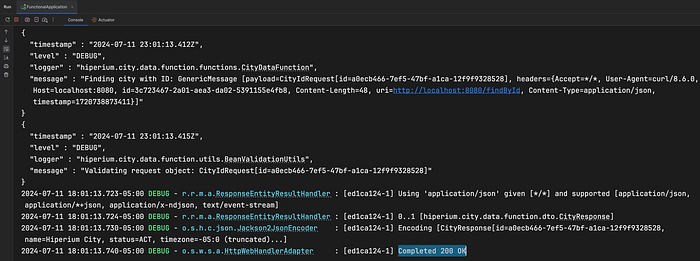
So here you have another option to test your Spring Boot projects directly from the IDE, where the framework automatically deploys a docker cluster for you before your Spring Boot application goes live.
Deploying to AWS.
I’ll use AWS SAM to deploy to AWS as I did in previous tutorials. So basically, we must execute the following commands:
IMPORTANT: If you want to create a function from scratch, you can check out my article about using SAM CLI to create a Lambda function that receives event messages from Amazon EventBridge.
sam build --config-env "your-config-env"

sam deploy                                    \
  --config-env "your-config-env"              \
  --parameter-overrides SpringProfile=dev     \
  --disable-rollback                          \
  --profile "your-aws-profile"
One important thing in our SAM configuration is the <Metadata> definition of the Lambda function in the <template.yaml> file:
CityDataFunction:
  Type: AWS::Serverless::Function
  Properties:
    FunctionName: "city-data-function"
    Handler: "org.springframework.cloud.function.adapter.aws.FunctionInvoker::handleRequest"
    CodeUri: .
    Policies:
      - DynamoDBReadPolicy:
          TableName: !Ref CitiesTable
    Environment:
      Variables:
        SPRING_PROFILES_ACTIVE: !Ref SpringProfile
  Metadata:
    BuildMethod: "makefile"
SAM should use a Makefile in the same project directory to generate the corresponding artifact before deploying it to AWS. In our case, we’re deploying a native Linux executable, so the content of this file must be as follows:
build-CityDataFunction:
./mvnw -T 4C clean native:compile -Pnative -f ./functions/city-data-function -DskipTests -Ddependency-check.skip=true
cp ./functions/city-data-function/target/native $(ARTIFACTS_DIR)
cp ./functions/city-data-function/tools/shell/bootstrap $(ARTIFACTS_DIR)
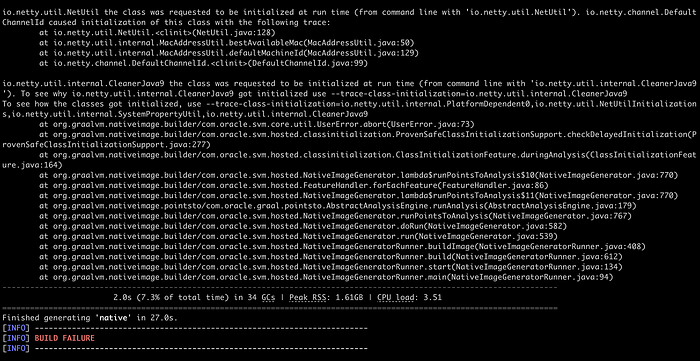
chmod 755 $(ARTIFACTS_DIR)/bootstrapSo, our first SAM command will execute the previous Makefile, which uses Maven to build the native Linux executable. You must see the following output at the end of the SAM execution:
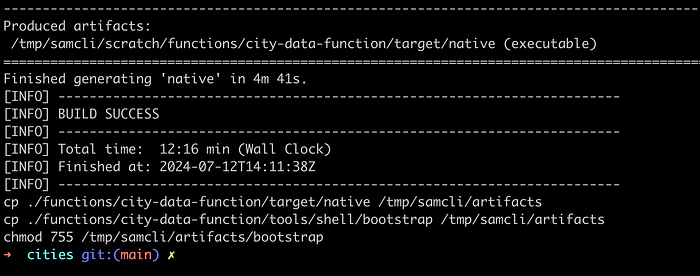
At the end of the command execution, SAM performs the CP commands defined in the Makefile. This directory is located inside the container where the build was executed, but in our project, SAM created a hidden folder called <aws-sam> with the following structure:
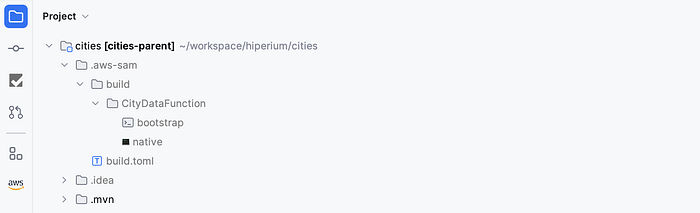
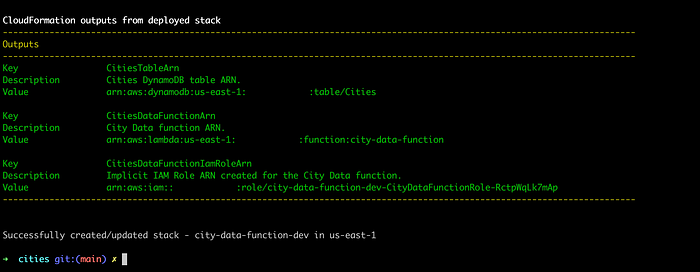
So when we try to deploy our function to AWS Lambda, SAM will package and deploy these artifacts for us. The following must be the result of our SAM second command execution:

As our resources are deployed to AWS, let’s insert some test data into the DynamoDB table as we did previously for integration tests, this time using the CLI:
aws dynamodb batch-write-item \
  --request-items file://functions/city-data-function/src/test/resources/localstack/table-data.json \
  --profile "your-aws-profile"
You must receive the same message when executing the integration tests or when deploying the Docker Compose cluster:

Let’s validate this by executing the following command to retrieve the existing items in our DynamoDB table on AWS:
aws dynamodb scan \
--table-name "Cities" \
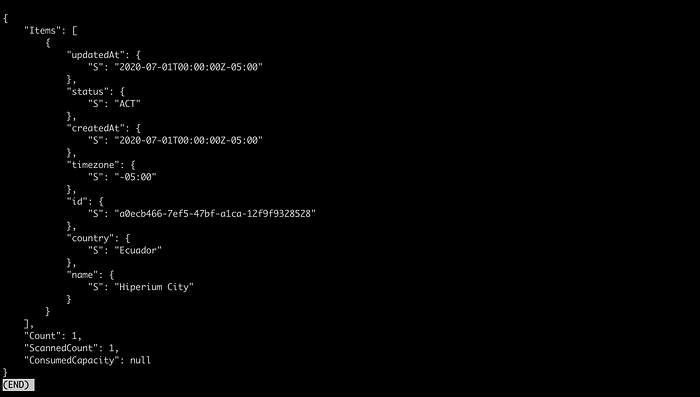
--profile "your-aws-profile"You must receive the following output, this time from AWS:
Now we have data in DynamoDB, so let’s call our Lambda function. First, open a new terminal window/tab and execute the following command to get the logs in real time of our Lambda function:
sam logs -n 'CityDataFunction'            \
  --stack-name "city-data-function-dev"   \
  --tail                                  \
  --profile "your-aws-profile"
Then, return to your original terminal window/tab and execute the following command to invoke the Lambda function in AWS:
aws lambda invoke --function-name "city-data-function" \
--payload file://functions/city-data-function/src/test/resources/requests/lambda-valid-id-request.json \
--cli-binary-format raw-in-base64-out \
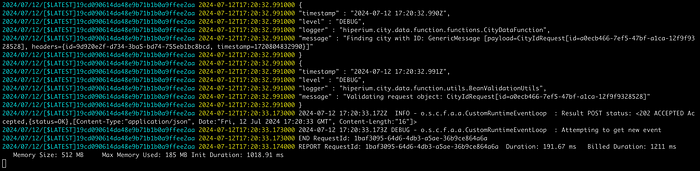
--profile "city-dev" response.jsonYou must receive an HTTP 200 response code in the terminal:

Open the other terminal window/tab to see the Lambda function logs:
Finally, print the content of the <response.json> file with the <cat> command to see the returned data from the Lambda function:
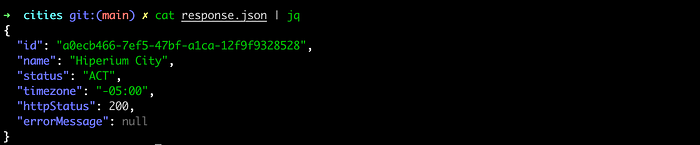
Excellent!!. Now you can delete all created resources in AWS using the SAM command:
sam delete                               \
  --stack-name "city-data-function-dev"  \
  --profile "city-dev"
You must see a successful message at the end of the command execution:

Perfect. Now you know how to deploy a Lambda function into AWS using SAM CLI ;)
Automation Scripts.
As usual, I created some bash scripts in the <utils/scripts> directory to automate the deployment in AWS using the same SAM commands you saw previously. You need to execute the following command from the project’s root directory:
./start.shChoose the correct option according to your needs:
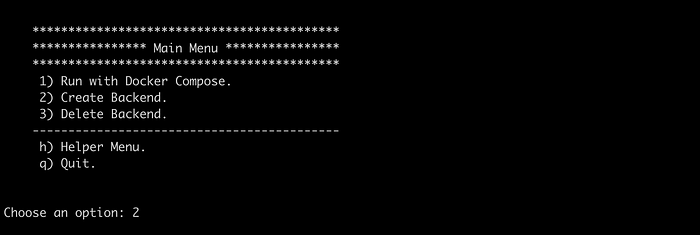
This may not be necessary, but when you have a lot of components to deploy, as with the previous tutorial, this could be time-saving. The following is an improvement of the last project’s tutorial automation file, which I’m working on for a future article:
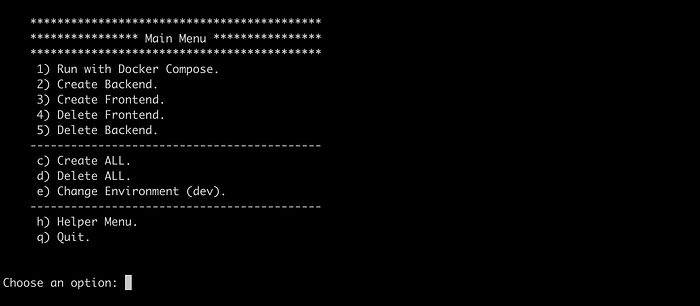
This option includes AWS commands like SAM, Copilot, and Amplify. The project contains a fullstack application, but the actual one has only one component. We’re creating the front-end project and maybe an ECS cluster later.
And that’s it!! You now know a new project dependency called Spring Cloud AWS that you can use in your Spring Cloud Functions projects to decrease the number of configuration classes, which you need to create different kinds of AWS SDK clients required to interact with your AWS resources.
I hope this article has been helpful to you, and I’ll see you in the next one.
Thanks for reading.